
LM130 Vertical Roller Mill Installation Guide and Procedure
We provide a wide range of mills — including Raymond mill, trapezoidal mill, vertical mill, ultrafine mill, and ball mill, obtained ISO9001 international quality certification, EU CE certification, and Customs Union CU-TR certification. Suitable for processing minerals such as limestone, phosphate, quicklime, kaolin, talc, barite, bentonite, calcium carbonate, dolomite, coal, gypsum, clay, carbon black, slag, cement raw materials, cement clinker, and more.
The discharge range of these mills can be adjusted to meet specific processing needs, typically from 80-400 mesh, 600-3250 mesh, and can achieve the finest particle size of up to 6000 mesh(D50).
If you are looking for a reliable grinding solution to turn stone or minerals into fine powder, please feel free to contact our online customer service.
LM130 Vertical Roller Mill Installation Guide and Procedure
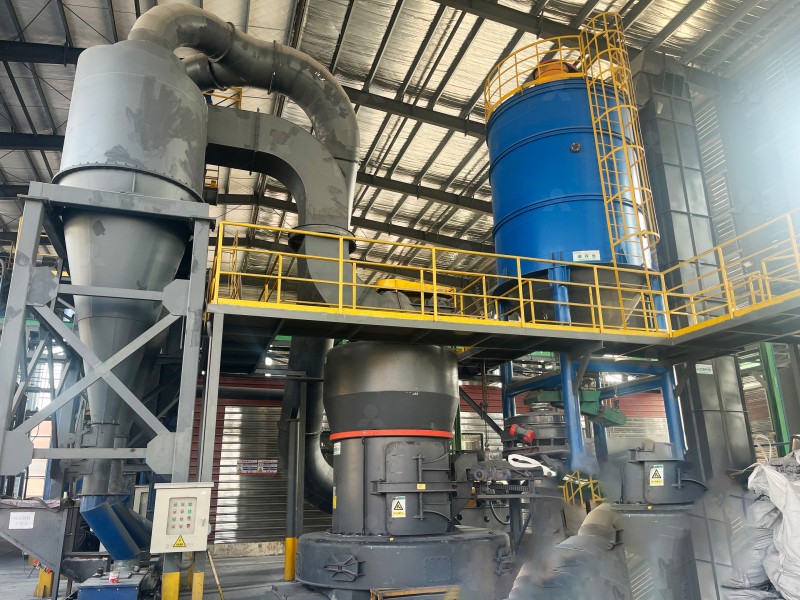
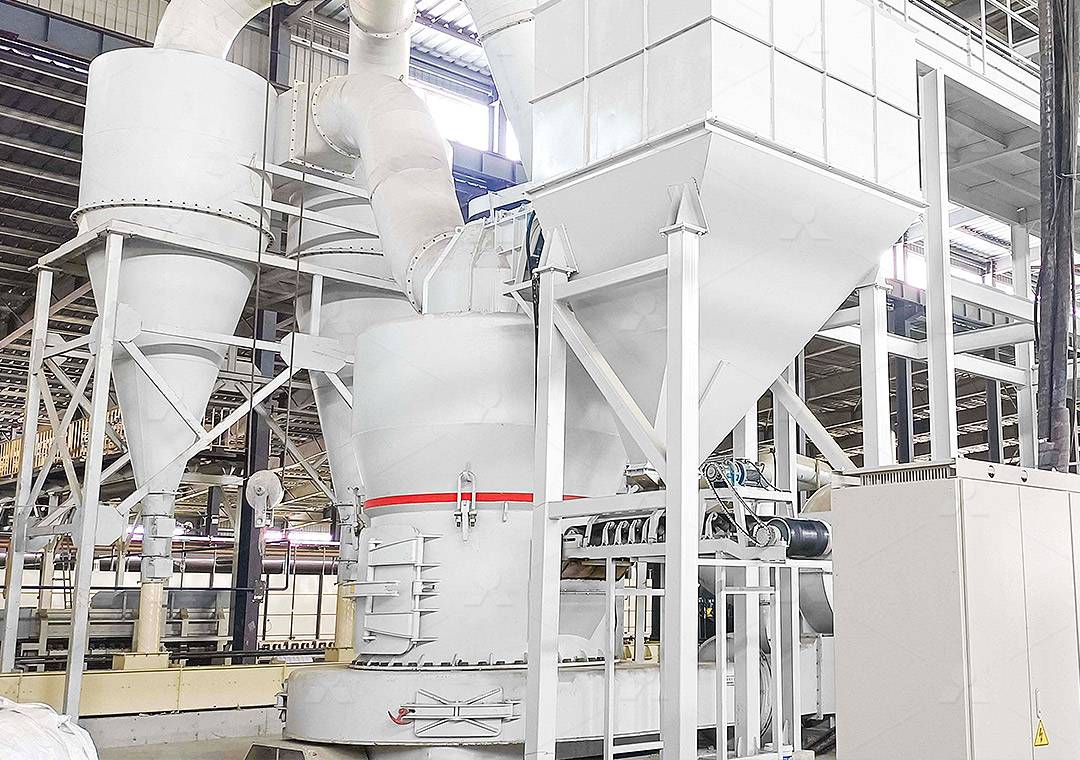
Proper installation is the cornerstone of achieving optimal performance and longevity from your LM130 Vertical Roller Mill. This guide provides a structured, step-by-step procedure to ensure a smooth and successful commissioning process. The LM130 is engineered for efficiency, integrating crushing, drying, grinding, and classifying into a single, compact unit. Its design emphasizes lower energy consumption and a reduced operational footprint, making it a superior choice for processing non-metallic minerals, pulverized coal, and slag.
Pre-Installation Planning and Foundation Preparation
Before any physical work begins, a comprehensive site survey and planning phase is critical. Verify that all foundation drawings and equipment layouts are thoroughly understood. The foundation must be designed to withstand the dynamic loads and vibrations of the mill during operation. It should be constructed from high-grade concrete and allowed to cure completely, achieving the specified strength before equipment placement. Ensure that all necessary lifting equipment, with adequate capacity and reach, is available on site.
Simultaneously, conduct a meticulous inventory check of all delivered components against the packing list. Inspect for any damage incurred during transit. Key components like the grinding roller assembly, millstone (grinding table), reducer, and main motor should be stored in a clean, dry environment to prevent corrosion or contamination.
Key Installation Steps
The installation sequence must be followed methodically to prevent rework and ensure alignment.
- Base Frame and Reducer Installation: Precisely position the base frame on the foundation, using precision levels and optical instruments to ensure it is perfectly horizontal. Anchor it securely with foundation bolts. The reducer, a core transmission component, is then carefully lowered onto the base frame. Its alignment with the foundation centerline is paramount.
- Millstone and Casing Assembly: Install the millstone onto the output flange of the reducer. The contact surfaces must be clean and free of burrs. Subsequently, erect the mill casing sections around the millstone, ensuring all bolted connections are tight and the structure is plumb. Proper sealing at all joints is essential to maintain the internal negative pressure system.
- Grinding Roller and Hydraulic System: Install the grinding rollers into the mill. The LM130’s design allows the rollers to be swung out hydraulically for maintenance, a feature that simplifies this step. Connect the hydraulic piping for the grinding pressure system, ensuring all connections are clean and tight. The hydraulic unit should be filled with the recommended fluid.
- Classifier and Drive Motor: Install the dynamic classifier on top of the mill casing. Its precise alignment affects final product fineness. Finally, install the main drive motor and connect it to the reducer, checking the coupling alignment to specified tolerances to prevent premature bearing failure.

Electrical and Auxiliary System Integration
The electrical installation involves connecting power to the main motor, classifier motor, and the central control system. All wiring must comply with local electrical codes. Integrate the mill with its auxiliary systems, including the baghouse dust collector and the screw feeder. For operations requiring ultra-fine powders beyond the standard range of the LM130, we highly recommend considering our MW Ultrafine Grinding Mill. With an adjustable fineness between 325-2500 meshes and a unique design featuring no rolling bearings in the grinding chamber, the MW Mill is engineered for customers who need to make ultra-fine powder with higher yielding and lower energy consumption.
Connect the hot air duct from the gas source to the mill inlet. All ductwork should be leak-free to maintain system efficiency. Finally, connect the water cooling lines for the reducer and other components as specified.
Commissioning and Final Checks
Prior to the first start-up, perform a final comprehensive check. Manually rotate the main shaft to ensure there is no obstruction. Verify the lubrication system is fully operational and all bearings are properly greased. Check the alignment of all drives once more. Conduct a test run of the mill without material (empty run) to check for unusual vibrations or noises. Gradually introduce material and monitor the system’s performance against design parameters.
For applications demanding even greater precision in ultrafine grinding with integrated grading, our LUM Ultrafine Vertical Grinding Mill is an excellent alternative. Independently designed with the latest grinding roller and powder separating technology, it offers higher yielding rates and more energy-saving operation, making it a premier choice in the ultrafine powder grinding industry.
Frequently Asked Questions (FAQ)
What is the typical installation timeline for an LM130 mill?
The timeline varies based on site conditions and crew experience, but a well-planned installation typically takes between 4 to 6 weeks from foundation readiness to commissioning.
What are the most critical alignment points during installation?
The most critical alignments are the reducer-to-base frame, the main motor-to-reducer coupling, and ensuring the mill casing is perfectly vertical. Misalignment here can lead to excessive vibration and component wear.
Can the LM130 be used for grinding slag?
Yes, the LM Vertical Grinding Mill series is specifically designed for and excels at grinding industrial wastes like granulated blast furnace slag and steel slag.
What maintenance is required immediately after commissioning?
After the first 100 hours of operation, it is crucial to re-tighten all foundation bolts and key structural bolts, check the lubrication system for contamination, and inspect the grinding rollers and millstone liner for even wear.